How to Set Up NFC Tags Around the House for One-Touch Lighting
Use inexpensive NFC tags as intentional one-touch lighting controls for bedside scenes, entryways, desks, and whole-home off routines without adding wall switches.
Quick answer
NFC tags can act as inexpensive physical triggers for smart lighting by letting a phone scan a tag and run a personal automation or send a tag event to a smart-home controller. For Apple users, the Shortcuts app includes an NFC trigger that can run a personal automation automatically on supported devices. Home Assistant can also write and scan NFC tags and use each tag as an automation trigger, making tags useful for explicit scenes such as Bedtime, Reading, Entry Lights, and All Off.
Table of contents
- What an NFC lighting setup actually does
- NFC is best for intent, not occupancy
- Choose explicit actions instead of clever toggles
- Better: make the tag’s meaning stable
- What NFC tags should you buy?
- NTAG213, NTAG215, and NTAG216
- Memory size does not make the lighting response faster
- How to set up an NFC lighting automation on iPhone
- Step 1: Create the lighting scene
- Step 2: Open Shortcuts
- Step 3: Scan and name the tag
- Step 4: Add the lighting action
- Step 5: Configure automatic execution if appropriate
- Step 6: Test before mounting the tag
- Apple personal automations are tied to the device
- How Home Assistant handles NFC tags
- Step 1: Create the tag
- Step 2: Give it a human-readable name
- Step 3: Create the automation
- Step 4: Test phone behavior
- Apple Shortcuts vs Home Assistant for NFC lighting
- Seven NFC tag locations that actually make sense
- 1. Bedside table: Good Night
- 2. Front door: All Off
- 3. Desk: Work Lighting
- 4. Sofa: Movie Scene
- 5. Kitchen: Cooking Scene
- 6. Entry console: Welcome Lights
- 7. Guest room: Simple lighting instructions
- Tags can trigger scenes, scripts, or individual lights
- Individual light
- Scene
- Script
- Use conditional actions sparingly
- Label tags even if you want them visually discreet
- Test the NFC scan zone before permanent installation
- Be careful with metal surfaces
- Do not place NFC tags over electrical hardware casually
- Do NFC tags need to be writable forever?
- Do not use a lighting tag as an authentication system
- What happens when the internet is down?
- Make the automation idempotent when possible
- Give each household function its own tag
- Combining NFC with motion automation
- Combining NFC with illuminance
- A renter-friendly NFC lighting kit
- Common NFC lighting mistakes
- Using toggle for everything
- Hiding tags too well
- Permanently mounting before testing
- Buying huge-memory tags unnecessarily
- Expecting the tag itself to control the bulb
- Making NFC the only light control
- Putting security-critical actions on casual tags
- Mixing personal and household logic without planning
- The recommended setup for most homes
- Conclusion
Key takeaways
- An NFC tag is a deliberate physical trigger, not a motion sensor; it is best for scenes you intentionally want to activate by touching your phone to a known spot.
- Apple Shortcuts can use an NFC scan as a personal-automation trigger, while Home Assistant can write tags and use tag scans as automation events.
- Prefer explicit scene tags such as Bedtime, Reading, Entry Lights, and All Off over ambiguous toggles when multiple people or automations can change the same lights.
- Use standard NFC Forum/NDEF-compatible tags, test scanning before permanent placement, and keep a normal switch or app control available as a fallback.
Editorial transparency
Who worked on this article and how it was handled.
- Written by
- Daniel Reed
- Creation method
- Editorial research
AI assistance: AI assisted with research organization and drafting. Sources, factual claims, and the final article should be reviewed by a human editor before publication.
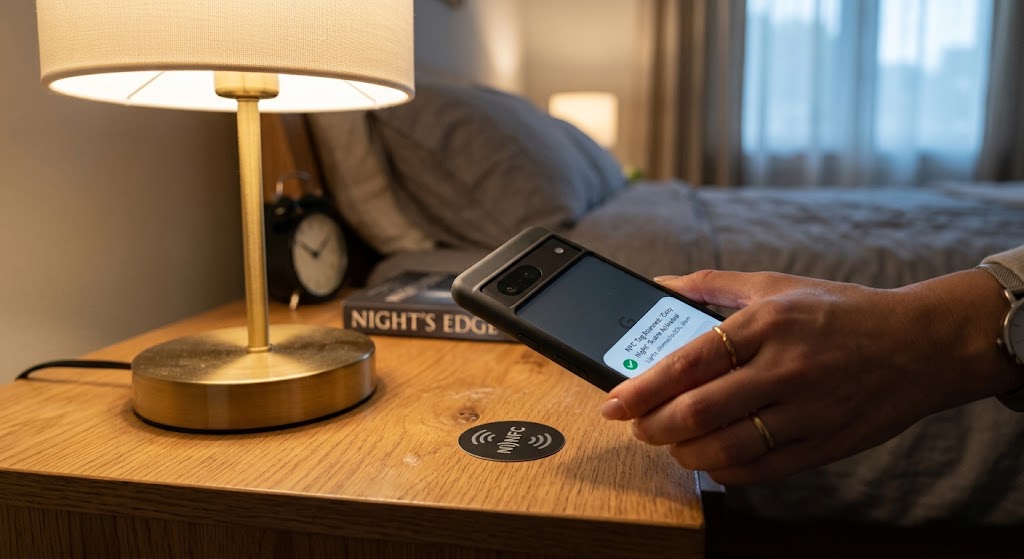
A smart-home button is useful because it gives you something physical to press. An NFC tag solves a similar problem for a few cents: place a small tag beside the bed, desk, front door, or sofa, bring your phone close to it, and let that scan trigger a lighting scene.
The interaction is intentionally different from motion or presence automation. NFC does not try to guess what you want. You choose to scan the tag, which makes it ideal for actions such as Bedtime, Reading Lights, Movie Scene, or All Off—commands where deliberate intent is more valuable than automatic detection.
The tag itself is not a smart switch and does not need to be wired into the lighting circuit. It simply provides an identifier or NDEF payload that a phone can read. Apple Shortcuts can use the NFC scan directly as a personal-automation trigger, while Home Assistant can turn a tag scan into a controller-level automation event.
What an NFC lighting setup actually does
The simplest architecture looks like this:
NFC tag
   ↓
Phone scans tag
   ↓
Automation platform identifies scan
   ↓
Smart-home command runs
   ↓
Light / scene changes
The important point is that the phone is usually the reader.
A passive NFC sticker does not connect to Wi-Fi, Thread, Zigbee, or Matter. It does not maintain an account and does not directly send a command to a light bulb.
That makes NFC tags attractive because they are:
- inexpensive;
- battery-free;
- very small;
- easy to hide;
- easy to move;
- useful for renters;
- independent of wall wiring.
The trade-off is equally clear:
You need to intentionally bring a compatible phone close enough to scan the tag.
NFC is best for intent, not occupancy
A motion sensor asks:
Did someone enter?
A presence sensor asks:
Is someone still here?
An NFC tag asks:
Did someone intentionally touch a phone to this spot?
Those are three different automation signals.
For hallway navigation, motion is usually better.
For automatically turning off an empty room, occupancy or presence is better.
For a scene that should happen only when you explicitly request it, NFC can be excellent.
Examples include:
- bedtime scene beside the mattress;
- reading scene beside an armchair;
- all-off tag near the front door;
- kitchen cleanup scene under a cabinet;
- movie scene near the sofa;
- work scene on a desk;
- temporary guest lighting instructions.
NFC is especially useful when adding a permanent smart button feels excessive.
Choose explicit actions instead of clever toggles
A common first idea is:
Scan tag
-> toggle lamp
That works technically.
It is not always the best UX.
Suppose the lamp is already on because:
- your roommate switched it on;
- a motion automation activated it;
- a schedule changed the scene;
- you controlled it from an app.
Now “toggle” means the NFC tag does the opposite of what you may have expected.
Better: make the tag’s meaning stable
Use tags with explicit outcomes:
READING
-> desk lamp 70%
-> floor lamp 30%
-> ceiling light off
BEDTIME
-> bedroom lamps 15%
-> hallway 10%
-> living room offLEAVING
-> all interior lights offThis remains understandable even when other automations change the lights during the day.
For a shared home, predictable commands usually beat clever state-dependent logic.
What NFC tags should you buy?
You do not need a high-capacity or expensive NFC product for a simple lighting automation.
A safe starting point is a standard NFC Forum-compatible tag that supports NDEF.
Android’s official NFC documentation recommends NDEF where possible because it is the standardized format with broad platform support.
NTAG213, NTAG215, and NTAG216
NXP’s NTAG21x family is widely used for ordinary NFC labels and cards.
According to NXP:
- NTAG213 provides 144 bytes of user read/write memory;
- NTAG215 provides 504 bytes;
- NTAG216 provides 888 bytes.
All three are NFC Forum Type 2 compliant.
A home-lighting trigger normally stores only a small identifier or URL, so capacity is rarely the deciding factor.
For that use, NTAG213 is typically sufficient.
Memory size does not make the lighting response faster
Do not buy NTAG216 because “888 bytes sounds faster.”
Memory capacity and scan speed are different issues.
Lighting responsiveness depends more on:
- the phone’s NFC reader;
- automation platform;
- app launch behavior;
- home-network latency;
- hub/controller availability;
- whether the final light command is local or cloud-routed.
How to set up an NFC lighting automation on iPhone
Apple Shortcuts includes an NFC trigger under personal automation.
Apple states that, after you scan the tag during setup, Shortcuts identifies it by its unique identifier; the contents stored on that tag are otherwise ignored for this specific trigger.
That creates a convenient Apple-only workflow because you do not necessarily need to write a custom URL onto the tag first.
Step 1: Create the lighting scene
Before touching NFC, make sure the lighting action already works.
For Apple Home, create a scene such as:
- Good Night;
- Reading;
- Movie;
- All Lights Off.
A scene is often better than issuing six individual lamp commands every time you scan.
Step 2: Open Shortcuts
Go to:
Shortcuts
-> Automation
-> New personal automation
-> NFC
Exact screen wording can change between OS releases, but Apple currently documents NFC as a supported personal-automation setting trigger.
Step 3: Scan and name the tag
Hold the supported iPhone near the tag.
Give it a useful name such as:
NFC - Bedside NightAvoid names like:
Tag 1
Tag 2
Tag 3
Six months later, you will not remember what those mean.
Step 4: Add the lighting action
Add the action that controls your Home accessory or scene.
For example:
When:
NFC - Bedside Night is scanned

Do:
Run "Good Night" scene
Step 5: Configure automatic execution if appropriate
Apple currently lists NFC among the personal automation types that can run automatically rather than requiring confirmation.
Review the automation settings and enable automatic execution where available and appropriate.
Step 6: Test before mounting the tag
Scan it several times from the position where you plan to install it.
Do this before peeling off adhesive backing.
Apple personal automations are tied to the device
This is easy to overlook in a multi-person home.
Apple’s current Shortcuts documentation says personal automations are device-specific.
That means an NFC automation created on your iPhone is not automatically the same thing as a household-wide Home automation.
If your partner scans the same physical tag, their phone will not necessarily run your personal Shortcut configuration.
For a single-person apartment, that may be fine.
For a household where multiple people need the same physical tag, a controller-based system such as Home Assistant can be easier to centralize.
How Home Assistant handles NFC tags
Home Assistant treats tags as first-class automation triggers.
Its Companion apps can read and write NFC tags.
The normal workflow is:
NFC tag
-> phone scans tag
-> Home Assistant receives tag identifier
-> tag trigger fires
-> Home Assistant runs lighting automation
Home Assistant documents the event as tag_scanned, and the same tag identifier can be connected to an automation.
Step 1: Create the tag
In Home Assistant, go to the Tags section and create or write the NFC tag using the Companion app.
The app can write a Home Assistant URL containing the tag identifier.
Step 2: Give it a human-readable name
For example:
Bedroom - Night SceneThe friendly name is for administration.
The automation still works from the unique tag ID.
Step 3: Create the automation
Home Assistant’s tag trigger can be selected from the visual automation editor.
A simplified YAML example:
alias: NFC - Bedside Night Scene

triggers:
  - trigger: tag
    tag_id: YOUR_TAG_ID

actions:
  - action: scene.turn_on
    target:
      entity_id: scene.bedroom_night
Replace the ID and scene with your own entities.
Step 4: Test phone behavior
Home Assistant’s current Companion documentation describes platform-specific behavior.
On Android, scanning a Home Assistant NFC tag can fire the event through the app.
On iOS, Home Assistant documents a notification/launch interaction for its NFC tag URL workflow.
That means “one touch” can feel slightly different depending on platform and app behavior.
Test the actual phones in your household rather than designing around an assumption.
Apple Shortcuts vs Home Assistant for NFC lighting
| Feature | Apple Shortcuts NFC | Home Assistant NFC |
|---|---|---|
| Requires Home Assistant server | No | Yes |
| Native iPhone personal automation | Yes | Uses Companion app/tag workflow |
| Central household automation logic | Limited by personal automation model | Strong |
| Tag can trigger HA scenes/scripts | Indirectly if integrated | Native |
| Android support | No | Yes |
| Good for one person’s apartment | Excellent | Excellent but more setup |
| Good for complex multi-user automations | Moderate | Strong |
| YAML required | No | No, optional |
The best platform depends on your existing smart home.
Do not install Home Assistant only because you want one bedside NFC tag.
Likewise, if Home Assistant already runs the entire house, putting tag logic in separate personal Shortcuts can create unnecessary duplication.
Seven NFC tag locations that actually make sense
The best tag location is somewhere you already pause or place your phone.
1. Bedside table: Good Night
A bedside tag can:
- turn off living-room lighting;
- dim bedroom lamps;
- leave a hallway night light on;
- activate a sleep scene.
This is one of the strongest NFC use cases because bedtime is intentional and predictable.
2. Front door: All Off
Place a tag inside the apartment near the exit.
Possible action:
All lights off
-> selected plugs off
-> thermostat away mode
For this article, keep the tag focused on lighting unless you explicitly want more actions.
Avoid using a publicly accessible tag outside the apartment for security-sensitive operations.
3. Desk: Work Lighting
The tag can activate:
- desk lamp;
- monitor bias light;
- ceiling task lighting;
- daylight color temperature.
A second explicit tag could activate:
WORK OFFrather than relying on toggle behavior.
4. Sofa: Movie Scene
Use a discreet tag under a side table or coaster location.
Scan:
ceiling lights off
floor lamp 10%
TV bias light on
5. Kitchen: Cooking Scene
A tag near the prep area can turn on:
- under-cabinet lights;
- task light;
- pantry light group.
Keep the tag away from water, grease, and heat unless its physical enclosure is designed for that environment.
6. Entry console: Welcome Lights
Instead of using geofencing, scan when you want a deliberate arrival scene:
entry lamp on
living room warm 40%
hallway on
7. Guest room: Simple lighting instructions
A clearly labeled NFC tag can give tech-comfortable guests a quick scene.
But never make NFC the only way a guest can turn the lights on.
A physical switch should still work.
Tags can trigger scenes, scripts, or individual lights
Think in layers.
Individual light
Good for a desk lamp.
Scan
-> desk lamp on at 70%
Scene
Better for a room.
Scan
-> Reading scene
Script
Best when the action needs logic.
A Home Assistant script can:
- turn off one group;
- fade another group;
- check time of day;
- set brightness;
- wait;
- perform another action.
The NFC tag should remain a simple trigger.
Put complex logic in the controller rather than duplicating it on every tag.
Use conditional actions sparingly
A tag can launch smarter logic.
For example:
IF time is after 11 p.m.
-> bedroom 10%
ELSE
-> bedroom 50%
That can be useful.
But every condition reduces predictability.
For physical controls, a good rule is:
The label should still accurately describe what happens.
A tag called BED LIGHT that sometimes turns on three rooms because of hidden conditions is poor interface design.
Label tags even if you want them visually discreet
A tiny icon can be enough:
- moon = bedtime;
- book = reading;
- door = all off;
- film = movie;
- bulb = lights;
- desk = work.
In shared homes, avoid totally invisible tags unless everyone knows where they are.
An invisible interface is elegant only when people can still discover it.
Test the NFC scan zone before permanent installation
Phone NFC antennas are not positioned identically on every device.
A tag can feel instant when scanned from one angle and inconsistent from another.
Before attaching it permanently:
- hold the tag in the proposed location;
- scan with every phone that will use it;
- rotate the phone naturally;
- test through any thin cover or furniture surface involved;
- confirm the automation finishes reliably.
NXP notes that NTAG operating distance depends on factors such as field strength and antenna geometry.
Treat the published maximum as an RF capability, not a promise that your phone will scan a sticker from several inches away through furniture.
NFC is fundamentally a close-range interaction.
Be careful with metal surfaces
NFC performance depends on the tag’s antenna and its RF environment.
A basic paper/sticker tag that scans perfectly on wood or drywall may behave differently when attached directly to a metal appliance, lamp, filing cabinet, or electrical faceplate.
If you need a tag on metal, use a tag product specifically designed for on-metal mounting and test it with the actual phone.
Do not hide an ordinary NFC sticker behind a metal switch plate and assume it will work.
Do not place NFC tags over electrical hardware casually
A lighting tag feels like a natural fit beside a wall switch.
Beside is usually better than inside.
Do not:
- open mains-voltage switches to hide NFC stickers;
- place tags inside electrical boxes;
- modify a fire-rated assembly;
- interfere with wireless or electrical devices.
For renters, attach the tag to a removable surface near the control:
- switch-plate edge where allowed;
- side table;
- furniture;
- removable label;
- wall-mounted non-electrical holder.
The goal is zero electrical modification.
Do NFC tags need to be writable forever?
Not necessarily.
NXP’s NTAG21x family supports read-only locking.
For a finished installation, making a tag read-only can prevent accidental rewriting.
But do not lock a tag until:
- the automation works;
- the name is final;
- the household has tested it;
- you know the tag will not need repurposing.
Some Home Assistant tags may also be read-only or one-time writable depending on the physical tag product.
A locked tag does not make the entire automation “secure.” It only changes whether the stored tag memory can be rewritten.
Do not use a lighting tag as an authentication system
This guide is about lighting.
That distinction matters.
A simple NFC sticker placed around the house should not be treated like a cryptographic key just because it has a unique identifier.
For low-risk commands such as:
- turn lights on;
- activate a scene;
- turn room lights off;
that is usually fine.
For sensitive actions such as:
- unlock exterior door;
- disable alarm;
- open garage;
- expose private data;
use the authentication and authorization mechanisms designed for those systems.
NFC convenience and access-control security are different topics.
What happens when the internet is down?
It depends on the rest of the smart-home stack.
The NFC scan itself is local radio communication between phone and tag.
But the lighting action may depend on:
- cloud-connected bulb service;
- a local Home hub;
- Home Assistant;
- Wi-Fi;
- Thread;
- Matter;
- vendor API.
A Home Assistant automation that controls a locally integrated light can often remain local.
A personal Shortcut that ultimately calls a cloud-only lighting vendor may fail during an internet outage.
NFC does not automatically make a cloud device local.
Make the automation idempotent when possible
In automation engineering, an idempotent action produces the intended end state even if it is triggered more than once.
Example:
Set Reading SceneIf you scan twice, the lights remain in Reading Scene.
Compare that with:
Toggle Reading LampScan twice accidentally and you end where you started.
This is another reason scene-based NFC design feels more reliable.
Use:
- set scene;
- set brightness;
- turn on;
- turn off;
when the desired result is explicit.
Use toggle only where the ambiguity is acceptable.
Give each household function its own tag
Do not encode one tag with an elaborate sequence like:
1st scan -> lights on
2nd scan -> dim
3rd scan -> movie
4th scan -> off
That requires the user to remember hidden state.
A few inexpensive tags are easier:
READ
MOVIE
NIGHT
OFF
The physical world becomes the interface.
That is the main advantage of NFC in the first place.
Combining NFC with motion automation
NFC and motion can complement each other.
Example hallway/bedroom logic:
Motion after sunset
-> hallway light 30%

Scan BEDTIME tag
-> bedroom scene on
-> hallway switches to night mode

Future hallway motion
-> hallway light 8%
Here NFC changes the household mode, while motion continues to handle movement.
That is more useful than making residents scan tags for every light they pass.
Combining NFC with illuminance
Another pattern:
Scan READING tag

IF room is already bright
-> turn reading lamp on at 35%

ELSE
-> reading lamp 70%
-> floor lamp 20%
This is technically elegant but should be used only if the result still feels predictable.
If every scan produces a surprising lighting state, simplify the automation.
A renter-friendly NFC lighting kit
For a small apartment, you could build a useful system with:
- 5–10 standard NFC Forum/NDEF tags;
- existing smartphone;
- smart bulbs, plugs, or switches already installed;
- Apple Shortcuts or Home Assistant;
- removable mounting dots or holders;
- printed icons.
Example deployment:
| Location | Tag | Action |
|---|---|---|
| Front door | ALL OFF | Turns apartment lights off |
| Bedside | NIGHT | Activates low bedroom and hallway scene |
| Desk | WORK | Activates task lighting |
| Sofa | MOVIE | Dims living room |
| Kitchen | COOK | Turns task lighting on |
No wall wiring is required.
Common NFC lighting mistakes
Using toggle for everything
State becomes confusing when other controls change the same light.
Hiding tags too well
Nobody except the installer knows where they are.
Permanently mounting before testing
Phone antenna position makes the chosen spot awkward.
Buying huge-memory tags unnecessarily
Simple automation triggers need very little storage.
Expecting the tag itself to control the bulb
The phone/controller still needs a valid automation path.
Making NFC the only light control
Guests and dead-phone scenarios become frustrating.
Putting security-critical actions on casual tags
Lighting is low risk. Door access and alarm control deserve stronger authentication.
Mixing personal and household logic without planning
One person’s iPhone Shortcut may not behave like a centralized Home Assistant tag automation.
The recommended setup for most homes
If you use Apple Home and one iPhone, start with Shortcuts.
Create:
- a stable lighting scene;
- an NFC personal automation;
- automatic execution where supported;
- a clearly labeled tag;
- a normal physical fallback.
If you already use Home Assistant, keep the automation centralized there.
Create:
- the NFC tag from the Companion app;
- a descriptive Home Assistant tag entry;
- a tag-triggered scene or script;
- any required user/device conditions;
- a manual lighting control that works independently.
For shared households, centralized controller logic is usually easier to maintain than recreating personal NFC automations on every phone.
Conclusion
NFC tags are one of the cheapest ways to add intentional physical controls to a smart home.
They work best where a motion sensor would be too automatic and opening an app would be too slow: beside the bed, at the front door, on a desk, or next to the sofa. Scan the tag and activate a scene with a clear outcome.
Apple Shortcuts provides a straightforward iPhone path using its NFC personal-automation trigger, while Home Assistant provides a centralized tag system that can work across more complex smart-home logic. In either case, use standard NFC/NDEF-compatible tags, test placement before mounting, and favor explicit actions such as Reading, Night, Movie, or All Off instead of ambiguous toggles.
The most successful NFC setup is not the one with the most tags. It is the one where every tag sits exactly where you naturally reach for your phone—and always does the same useful thing.
Common questions
Questions this guide answers
Can an NFC tag turn smart lights on without a battery?
Yes. Passive NFC tags do not need their own battery for normal use; the phone's NFC field powers the brief interaction needed to read the tag. The tag itself does not directly switch the light. The phone or smart-home controller receives the scan and then runs the lighting automation.
Can an iPhone run a lighting automation from an NFC tag?
Yes, on devices that support NFC automation. Apple Shortcuts includes an NFC personal-automation trigger. After scanning and naming a tag, you can add actions such as controlling a Home scene, and supported NFC personal automations can be configured to run automatically instead of asking for confirmation.
Can Home Assistant use NFC tags for lighting?
Yes. Home Assistant supports a tag trigger, and its Companion apps can read and write NFC tags. Scanning a Home Assistant tag fires a tag_scanned event that can start an automation such as activating a lighting scene or turning off a group of lights.
What NFC tags should I buy for home automation?
Standard NFC Forum-compatible NDEF tags are the safest starting point. NXP NTAG213, NTAG215, and NTAG216 are common NFC Forum Type 2 chips with different memory sizes; simple home-automation identifiers need very little storage, so large memory capacity is generally unnecessary.
Should one NFC tag toggle a light on and off?
It can, but explicit scene tags are often easier to understand. A tag labeled Reading Lights, Night Mode, or All Off produces a predictable result regardless of the current state, while a toggle can become confusing when another person or automation has already changed the lights.
Evidence & further reading
Sources & references
Primary and authoritative references used to support or contextualize this article. Links open the original source.
- 1Setting triggers in Shortcuts on iPhone or iPad
Apple Support · Accessed Aug 30, 2026
Supports NFC as a personal-automation trigger and notes that Shortcuts uses the scanned tag identifier rather than the tag's stored contents for this trigger.
- 2Enable or disable a personal automation in Shortcuts on iPhone or iPad
Apple Support · Accessed Aug 30, 2026
Supports configuring NFC personal automations to run automatically without confirmation on supported devices.
- 3Create a new home automation in Shortcuts on iPhone or iPad
Apple Support · Accessed Aug 30, 2026
Supports using Shortcuts and Home actions to control accessories and scenes.
- 4Universal Links, NFC & QR Tags
Home Assistant Companion Docs · Accessed Aug 30, 2026
Supports Home Assistant NFC tag writing, tag-scanned events, Android/iOS behavior, and the URL/tag identifier format.
- 5Tag
Home Assistant · Accessed Aug 30, 2026
Supports using a scanned NFC tag as a Home Assistant automation trigger.
- 6NFC basics
Android Developers · Accessed Aug 30, 2026
Supports Android's NDEF handling and NFC tag-dispatch behavior.
- 7NTAG 213/215/216
NXP Semiconductors · Accessed Aug 30, 2026
Supports NFC Forum Type 2 compliance, NDEF compatibility, available user memory, passive contactless operation, and read-only locking capability.
- 8Specifications
NFC Forum · Accessed Aug 30, 2026
Supports NDEF as the common data format for NFC Forum-compliant devices and tags and defines NFC Forum tag types.

About the author
Daniel Reed
Daniel writes about connected-home standards, small-space technology, device interoperability, and privacy-conscious urban living.
More from Daniel →Make your home smarter without buying every gadget.
One useful idea, one product worth knowing, and one energy-saving action—delivered weekly.
No spam. Unsubscribe anytime.
Semantic recommendations
Related reading
Selected from topic cluster, entities, tags, search intent, and editorial relationships.
5 Essential Home Assistant Automations for Energy Saving
These five Home Assistant automations target the biggest sources of avoidable household energy use: HVAC runtime, unnecessary lighting, standby loads, expensive tariff windows, and solar heat gain.

Smart Motion Sensor Automations for Dark Apartment Hallways
Build hallway lighting that turns on only when needed, stays dim at night, and avoids the annoying false-offs common with basic motion automations.
Home Assistant Starter Guide: How to Build a Private, Local Smart Home
Home Assistant lets you run automations, dashboards, and device control on hardware inside your home. This beginner guide shows the cleanest 2026 path to a private, local-first setup.
Local DIY Smart Home Hub vs Cloud Ecosystems for Studio Apartments
Compare local smart home hubs with Apple Home, Google Home, Alexa, and other cloud ecosystems to choose the right setup for a small studio apartment.