
Outdoor Motion Sensor Lighting: How to Prevent False Alarms from Animals
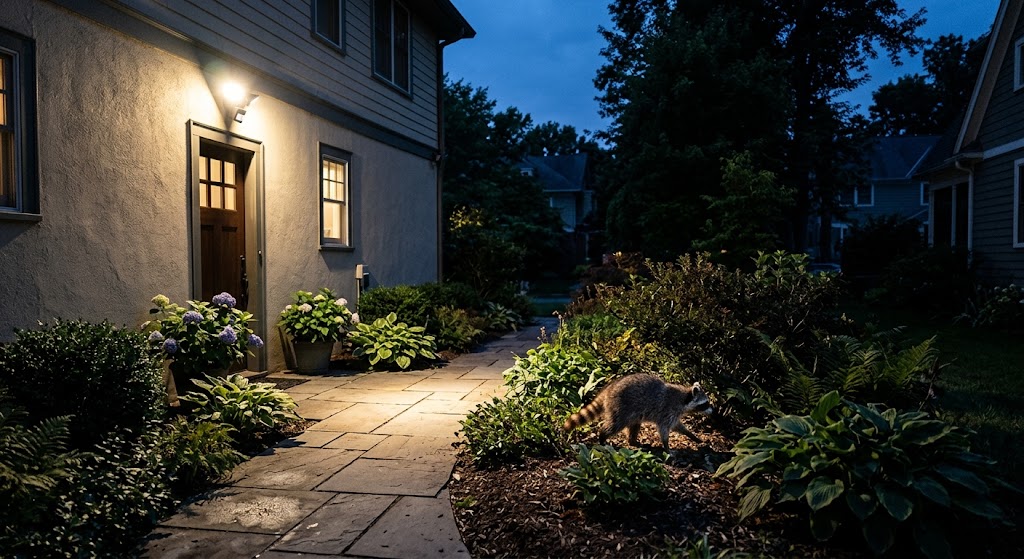
Outdoor motion lights that trigger for cats, raccoons, birds, or swaying branches usually need better sensor placement, sensitivity, and detection-zone control rather than a brighter fixture.
Quick answer
To reduce animal-triggered false activations from outdoor motion lighting, first aim the sensor so its active zone covers the human approach path instead of the ground, shrubs, fence tops, or pet routes. Then lower sensitivity, shorten the detection range, mask unused zones where the product supports it, and consider a dual-PIR or pet-tolerant outdoor sensor if cats, raccoons, foxes, or other small animals remain a recurring problem.
Table of contents
- Start With the Sensor, Not the Light
- Why Small Animals Can Trigger a Sensor So Easily
- The Best First Fix: Change the Detection Geometry
- Good target areas
- Poor target areas
- Mounting Height Is Part of the Detection Algorithm
- Do Not Mount the Sensor on Something That Moves
- Step 1: Reduce Sensitivity One Level at a Time
- A better tuning process
- Step 2: Shorten the Detection Range
- Step 3: Mask the Lowest or Unwanted Zones
- Step 4: Move Vegetation Out of the Detection Zone
- Step 5: Keep the Sensor Away From Animal Magnets
- Step 6: Use a Daylight Threshold
- Step 7: Shorten the Light-On Time
- Why False Activations Matter Beyond the Electric Bill
- Repeated light pollution
- Neighbor disturbance
- Habituation
- Pet-Immune Sensors: What the Term Actually Means
- When It Is Worth Upgrading the Sensor
- PIR vs. Dual-PIR vs. Radar: Which Is Better Around Animals?
- Basic PIR
- Dual-PIR / multi-zone pet-tolerant detection
- Radar or microwave-assisted sensing
- What About Camera-Based Person Detection?
- A Practical Setup for a Cat-Heavy Front Yard
- Common Mistakes
- Lowering sensitivity too far
- Aiming straight down
- Pointing at moving vegetation
- Covering half the lens with improvised tape
- Assuming higher mounting is always better
- Buying an indoor sensor for outdoor use
- Installation and Electrical Safety
- Separate wireless sensor + smart light
- Hardwired motion floodlight
- Final Tuning Checklist
- Conclusion
Key takeaways
- Aim and detection-zone design usually matter more than simply reducing sensitivity.
- Keep the most sensitive detection area focused on human approach paths rather than ground-level pet routes, shrubs, branches, or neighboring traffic.
- Dual-PIR and pet-tolerant outdoor detectors can reject more animal movement, but only when mounted and configured according to the product's required geometry.
- Shortening detection distance or masking unnecessary zones can prevent activity outside the area you actually care about from turning the lights on.
- Use daylight sensing, reasonable timeout settings, and controlled light levels so occasional false activations waste less energy and create less unnecessary light at night.
Editorial transparency
Who worked on this article and how it was handled.
- Written by
- Daniel Reed
- Creation method
- Editorial research
AI assistance: AI assisted with research organization and drafting. Sources, factual claims, and the final article should be reviewed by a human editor before publication.
A motion-activated porch or driveway light is supposed to respond when a person approaches. When the fixture flashes on every time a neighborhood cat walks past, a raccoon crosses the lawn, or a bird lands near the sensor, the automation stops feeling useful.
The instinctive fix is usually to turn sensitivity all the way down. That can reduce nuisance activations, but it can also shrink the useful detection area until a real visitor is already at the door before the light reacts. The better solution is to understand what part of the sensor’s field of view is being triggered and tune the detection geometry before sacrificing useful coverage.
This guide explains how animal-triggered motion lighting happens, how to correct sensor aim and range, when masking is useful, and when it makes sense to replace a simple outdoor sensor with a dual-PIR or pet-tolerant design.
Start With the Sensor, Not the Light
The lamp and the motion detector are two different parts of the system.
A bright LED floodlight can work perfectly while its sensor is poorly aimed. Replacing the entire fixture will not necessarily solve the problem if the new detector watches the same cat path, shrub line, or driveway edge.
Most consumer outdoor motion lights and many smart-lighting sensors rely on passive infrared sensing, commonly called PIR.
A PIR detector does not identify a cat, a person, or a raccoon in the way a security camera can. It responds to changing infrared patterns within its field of view.
That explains why three very different events can all activate the same light:
- a person crossing the driveway;
- a warm animal moving close to the detector;
- vegetation moving between warmer and cooler background areas.
The goal is therefore not to make the detector “ignore motion.” It is to make the detector pay attention to the right motion in the right part of the yard.
Why Small Animals Can Trigger a Sensor So Easily
A cat is smaller than an adult human, but size alone does not determine what the sensor sees.
Distance matters.
An animal moving two feet from the sensor may fill a much larger portion of the detector’s field of view than a person walking 25 feet away.
That is why a small animal close to the fixture can sometimes produce a very strong trigger.
Common animal routes include:
- along the foundation;
- beneath a porch light;
- over a low fence;
- through landscaping beside the driveway;
- across a deck;
- on top of bins or outdoor furniture.
If the sensor points directly into one of those paths, false activations are predictable rather than mysterious.
The Best First Fix: Change the Detection Geometry
Before touching the sensitivity slider, stand where the sensor is mounted and imagine what it sees.
You want the detection area to intersect the human approach path while minimizing unnecessary coverage of animal traffic.
Good target areas
For a front entrance, that may mean:
- the upper portion of the walkway;
- the path between the sidewalk and porch;
- the central driveway approach;
- the gate opening.
Poor target areas
Try not to make the strongest part of the detection zone stare directly at:
- the first few feet of ground under the fixture;
- shrubs moving in the wind;
- a tree branch;
- a fence top used by cats;
- a bird feeder;
- trash or compost containers;
- the street or sidewalk outside your property;
- HVAC exhaust or other sources of changing heat.
Small changes in angle can produce a much larger improvement than a large change in sensitivity.
Mounting Height Is Part of the Detection Algorithm
Pet-tolerant sensors often rely on physical geometry, not just software.
Ajax, for example, specifies a narrow mounting-height range for some of its outdoor pet-immune detectors. The company explains that its dual sensors are arranged so a correctly installed small animal should normally enter only one detection area, while a human body intersects both.
OPTEX uses a related principle in several outdoor detectors: multiple PIR zones and AND logic are used so more than one required zone must be activated before the detector reports motion.
The important lesson is not to copy one manufacturer’s mounting height onto a different motion light.
It is this:
If a product claims pet immunity, its mounting height and aiming instructions are part of that feature.
Installing it higher, lower, or at a different angle can defeat the geometry the manufacturer designed.
Always use the mounting height specified for the actual sensor.
Do Not Mount the Sensor on Something That Moves
A motion detector should be mounted on a stable surface.
That sounds obvious, but outdoor installations often end up attached to:
- lightweight fence panels;
- loose posts;
- thin decorative structures;
- flexible siding accessories.
Ajax specifically warns that unstable mounting can result in false alarms.
A moving sensor changes its own view of the environment. Even if the cat is not moving, the sensor itself can effectively create movement across its detection zones when the mounting surface vibrates.
Mount to a rigid location whenever possible.
Step 1: Reduce Sensitivity One Level at a Time
Once the sensor is aimed correctly, adjust sensitivity.
Do not immediately select the lowest available setting.
Philips Hue’s current outdoor sensor documentation provides a useful real-world example: users can lower motion sensitivity when the sensor triggers too often because of swaying branches.
Use the same general tuning method for any adjustable outdoor sensor.
A better tuning process
- Start at the default or medium sensitivity.
- Trigger the system by walking through the intended approach path.
- Note how far away the light activates.
- Wait for the system to reset.
- Test the known animal-trigger area.
- Reduce sensitivity one step.
- Repeat both tests.
Stop when animal activity falls substantially without creating an unacceptable human-detection blind spot.
The correct setting is not the lowest setting. It is the lowest setting that still reliably covers the area that matters.
Step 2: Shorten the Detection Range
If your sensor lets you limit distance, this can be more effective than reducing sensitivity globally.
Imagine the only area you need to illuminate is a 20-foot driveway, but the sensor sees motion 40 feet away.
You may be reacting to:
- pedestrians on the sidewalk;
- animals across the yard;
- moving vehicles;
- neighboring activity.
OPTEX explicitly uses detection-range limiting as a false-alarm reduction strategy in some outdoor sensors.
A shorter range lets you keep useful sensitivity inside the protected zone while ignoring activity beyond it.
That is usually a better trade-off.
Step 3: Mask the Lowest or Unwanted Zones
Some higher-end motion detectors include physical or software-based zone masking.
Masking means excluding part of the detection pattern.
This is particularly useful when the false trigger comes from a very predictable location.
Examples:
- the lowest few feet beneath the sensor;
- a pet path along one edge of the yard;
- a moving tree on the far right side;
- neighboring traffic at the end of a driveway.
OPTEX’s outdoor designs provide examples of short-range zone masking and detection-area restriction intended to eliminate unwanted triggers.
If your consumer motion light does not offer masking, careful aiming can produce a simpler version of the same result.
Do not cover the sensor with random tape unless the manufacturer specifically allows masking in that way. Adhesive, heat, weather, and lens optics can create unpredictable behavior.
Step 4: Move Vegetation Out of the Detection Zone
A shrub does not generate body heat, but that does not mean it cannot create nuisance motion patterns.
Wind moves vegetation across backgrounds with different thermal characteristics.
Some outdoor sensor manufacturers explicitly design algorithms to reduce false triggers from moving vegetation because it is a common outdoor interference source.
Trim branches that sit directly in front of the sensor.
Pay particular attention to vegetation that:
- moves strongly in moderate wind;
- sits very close to the sensor;
- reflects morning or afternoon sun;
- repeatedly crosses the edge of a detection zone.
If trimming is not practical, re-aiming the sensor may be more effective.
Step 5: Keep the Sensor Away From Animal Magnets
Sometimes the problem is not the detector at all.
The sensor may simply be installed above the most attractive spot in the yard.
Common examples include:
- bird feeders;
- pet food;
- trash cans;
- compost;
- fruiting plants;
- outdoor water bowls;
- warm vents.
If animals repeatedly approach the same spot, the most reliable way to prevent lighting triggers may be to separate that spot from the sensor’s field of view.
Moving a feeder ten feet can be more effective than weeks of sensitivity adjustments.
Step 6: Use a Daylight Threshold
False triggers are much less annoying when they do not turn the lights on during daylight.
Many smart outdoor sensors combine motion detection with a light sensor.
Philips Hue’s outdoor sensor, for example, includes daylight sensing so the system can be configured to avoid unnecessary lighting when ambient light is already sufficient.
This does not stop the sensor from detecting movement.
It prevents the lighting consequence when that movement is irrelevant.
For a porch or garden path, use motion activation only below the daylight level at which additional lighting is actually useful.
Step 7: Shorten the Light-On Time
You may never eliminate every animal trigger.
A moth, a bird close to the lens, or an unusual animal path can still activate a well-configured system.
The next goal is to make each false activation less costly.
If your motion light stays on for 15 minutes after every trigger, a busy night can produce hours of unnecessary illumination.
For a simple entry path, a shorter timeout may be enough.
The correct duration depends on the use case:
- short path lighting can often use a brief interval;
- a driveway or stair area may need longer;
- work areas may need manual override.
DOE’s exterior-lighting guidance supports automatic controls specifically because lighting should not remain on unnecessarily in unoccupied areas.
Why False Activations Matter Beyond the Electric Bill
With LED lighting, one short false activation does not usually cost much.
The bigger problems are cumulative.
Repeated light pollution
DOE’s guidance on light at night emphasizes using outdoor light only when needed and directing it only where necessary.
A floodlight that activates dozens of times because wildlife crosses the yard is doing the opposite.
Neighbor disturbance
Repeated bright light can affect:
- nearby windows;
- sleeping areas;
- shared courtyards.
Habituation
If the light activates constantly for harmless motion, people in the home may stop treating the event as meaningful.
A security-related automation is more useful when activation is relatively uncommon and relevant.
Pet-Immune Sensors: What the Term Actually Means
“Pet immune” does not mean “cannot detect animals.”
It usually means the sensor has been designed to reduce triggers from animals under defined installation conditions.
Methods include:
- dual PIR elements;
- AND detection logic;
- multiple detection zones;
- signal-pattern analysis;
- limited lower-zone sensitivity;
- radar plus PIR in dual-technology detectors.
OPTEX’s HX-80N, for example, uses upper and lower detection areas that must both be activated for an alarm condition. The company specifically positions that geometry as a way to reduce small-animal false triggers.
Ajax uses multiple IR sensors and installation geometry in some outdoor products so small animals are more likely to intersect only one detection zone.
These are security-detector examples, but the engineering lesson applies directly to outdoor lighting:
purpose-built animal tolerance is more sophisticated than simply turning a sensitivity dial down.
When It Is Worth Upgrading the Sensor
A simple adjustable PIR motion light is usually enough when:
- false triggers are occasional;
- there is one clear human approach path;
- animal traffic is low;
- you can aim the sensor away from landscaping.
Consider a more sophisticated outdoor sensor when:
- cats or wildlife cross the property every night;
- the installation cannot avoid ground-level animal routes;
- the protected area needs high human-detection reliability;
- sensitivity reduction creates unacceptable blind spots;
- you need a long or carefully shaped detection zone.
For a smart-lighting setup, another option is to separate the motion sensor from the light fixture.
That lets you place the sensor where detection works best instead of accepting the location dictated by electrical wiring.
A battery-powered outdoor sensor such as Philips Hue’s current model illustrates this architecture: the sensor can be placed independently and then used to control connected lights.
That flexibility can be more important than buying a more powerful floodlight.
PIR vs. Dual-PIR vs. Radar: Which Is Better Around Animals?
Basic PIR
Best for: simple porches and pathways
Advantages: inexpensive, low power, widely available
Weakness: can respond to animals or environmental movement when the detection pattern is poorly matched to the site
For most homes, good PIR placement is enough.
Dual-PIR / multi-zone pet-tolerant detection
Best for: frequent small-animal activity
Advantages: can require multiple detection conditions before triggering
Weakness: installation geometry becomes more important
This is the strongest category when animal rejection matters.
Radar or microwave-assisted sensing
Best for: specialized outdoor or commercial sensing
Advantages: can add another sensing dimension
Weakness: more technology does not automatically mean fewer false triggers
Signify’s professional outdoor multisensor platform, for example, uses radar for on-demand lighting applications.
Dual-technology security detectors may combine microwave and PIR logic.
But for a homeowner, the purchase decision should be based on the product’s documented outdoor behavior and configuration—not merely the word “radar” on the box.
What About Camera-Based Person Detection?
A security camera can distinguish people, animals, vehicles, and packages far more explicitly than a conventional motion light when it has reliable object classification.
That can be useful if your real goal is security event recognition, not simply path lighting.
But camera-based lighting introduces additional considerations:
- privacy;
- cloud subscriptions;
- Wi-Fi reliability;
- processing delay;
- nighttime image quality.
It can also be overkill for a porch light.
Use a camera when you need to know what moved. Use a well-configured motion sensor when you simply need light to follow human activity.
A Practical Setup for a Cat-Heavy Front Yard
Suppose a porch light activates every night because cats walk along the foundation.
A sensible configuration would be:
- aim the sensor farther outward so the strongest coverage crosses the walkway rather than the wall base;
- shorten the detection range so it does not include the entire garden;
- use medium rather than maximum sensitivity;
- mask or avoid the lowest near-field zone if the sensor supports it;
- keep the sensor away from pet food or bins;
- use the daylight threshold so motion does not activate the light unnecessarily before dusk;
- shorten the timeout to the minimum that safely covers the entry path.
Then perform a walk test.
Walk:
- toward the door;
- across the walkway;
- from the driveway;
- at the edge of the desired zone.
The system is only improved if it rejects animal motion and still catches people where you need it to.
Common Mistakes
Lowering sensitivity too far
The light stops triggering for the cat—and for visitors.
Fix geometry first.
Aiming straight down
This gives excellent coverage of the area where animals are most likely to walk.
Aim across the human route instead.
Pointing at moving vegetation
Wind becomes a nightly test of the sensor.
Covering half the lens with improvised tape
Use manufacturer-supported masking or physical re-aiming instead.
Assuming higher mounting is always better
Pet-immunity algorithms can depend on a specific mounting height.
Buying an indoor sensor for outdoor use
Ajax explicitly warns that installing indoor-only detectors outside can cause false alarms and device failure.
Use a product rated for outdoor temperature, moisture, and exposure.
Installation and Electrical Safety
There are two very different motion-light architectures.
Separate wireless sensor + smart light
The sensor is usually battery powered and can often be relocated without electrical work.
This is the easier tuning option.
Hardwired motion floodlight
The motion detector and light are part of mains-powered exterior wiring.
Do not adjust wiring, junction boxes, or line-voltage connections with the circuit energized.
For fixture replacement:
- follow the manufacturer’s installation instructions;
- use outdoor-rated boxes, seals, and fittings;
- follow local electrical code;
- use a qualified electrician when the wiring condition or installation requirements are uncertain.
Sensor aiming and settings are normal homeowner adjustments. Reworking exterior mains wiring is a different task.
Final Tuning Checklist
Use this sequence before replacing the system:
- Confirm the sensor is rated for outdoor use.
- Identify the exact location of the animal-trigger path.
- Aim the sensor across the human approach route.
- Keep the strongest near-field zone away from the ground directly below.
- Move or trim nearby vegetation.
- Shorten the detection distance where possible.
- Mask irrelevant zones using supported controls.
- Lower sensitivity gradually rather than immediately choosing minimum.
- Enable a daylight threshold.
- Reduce light-on duration where safe.
- Confirm the mounting surface is rigid.
- Follow the manufacturer’s required height for pet-tolerant sensors.
- Walk-test every important human approach path after each major adjustment.
Conclusion
If animals keep turning on your outdoor motion lights, replacing the fixture should not be your first move.
Start with detection geometry: aim the sensor at the route people actually use, reduce unnecessary near-ground and long-distance coverage, then tune sensitivity. Add daylight thresholds and shorter timeouts so the occasional remaining trigger has less impact.
If cats, raccoons, foxes, or other animals still dominate the detection zone, upgrade to an outdoor sensor specifically designed for pet tolerance, multi-zone filtering, or adjustable detection areas.
The best motion light is not the one that detects the most movement. It is the one that reliably lights the space when a person needs it—and stays dark when everything else moves.
Common questions
Questions this guide answers
Why does my outdoor motion light keep turning on for animals?
Many outdoor motion lights use passive infrared sensing and react to moving heat patterns within their detection zones. A warm animal crossing close to the sensor can create a strong enough change to trigger the light, especially when sensitivity is high or the sensor is aimed toward the ground or a common animal path.
Will lowering motion sensitivity stop cats from triggering the light?
It can help, but sensitivity alone is rarely the best fix. Re-aiming the sensor, reducing detection distance, and excluding the lowest detection zones usually preserve better human detection than simply turning sensitivity down as far as possible.
What is a pet-immune outdoor motion sensor?
A pet-tolerant outdoor detector uses its detection geometry, multiple PIR elements, signal processing, or a combination of technologies to distinguish likely human movement from smaller animals. Performance depends heavily on correct mounting height, aiming, and configuration.
Can tree branches and insects trigger outdoor motion lights too?
Yes. Moving vegetation can create changing infrared patterns, and insects very close to a sensor can occupy a large portion of its field of view. Outdoor products with adjustable sensitivity, constrained zones, and environmental filtering can reduce these nuisance activations.
Evidence & further reading
Sources & references
Primary and authoritative references used to support or contextualize this article. Links open the original source.
- 1Outdoor sensor
Philips Hue · Accessed Aug 10, 2026
Supports outdoor motion-light automation, adjustable motion sensitivity, daylight sensing, outdoor operating conditions, and the manufacturer's guidance that sensitivity can be reduced when branches cause frequent triggers.
- 2HX-80N
OPTEX America · Accessed Aug 10, 2026
Supports dual-PIR AND-logic as an outdoor detection strategy for distinguishing humans from small animals and reducing nuisance alarms.
- 3HX-80NAM
OPTEX America · Accessed Aug 10, 2026
Supports detection-range limiting, masking short-range zones, and animal-tolerant outdoor PIR design.
- 4MotionProtect Outdoor Jeweller user manual
Ajax Systems · Accessed Aug 10, 2026
Supports the importance of mounting height, stable mounting surfaces, sensor geometry, and correct installation for pet-immunity functions.
- 5DualCurtain Outdoor User manual
Ajax Systems · Accessed Aug 10, 2026
Supports adjustable detection distance as a way to avoid false activations from bushes, trees, or other objects and illustrates multi-sensor pet filtering.
- 6Purchasing Energy-Efficient Exterior Lighting
U.S. Department of Energy · Accessed Aug 10, 2026
Supports the use of automatic controls and motion detectors to reduce unnecessary exterior-lighting operation.
- 7Light at Night
U.S. Department of Energy · Accessed Aug 10, 2026
Supports responsible outdoor-lighting principles including using light only when needed, directing it only where necessary, and minimizing unnecessary nighttime illumination.

About the author
Daniel Reed
Daniel writes about connected-home standards, small-space technology, device interoperability, and privacy-conscious urban living.
More from Daniel →Make your home smarter without buying every gadget.
One useful idea, one product worth knowing, and one energy-saving action—delivered weekly.
No spam. Unsubscribe anytime.
Semantic recommendations
Related reading
Selected from topic cluster, entities, tags, search intent, and editorial relationships.

How to Set Up Perimeter Lighting That Triggers During Security Alerts
Turn outdoor lights into a coordinated security response. This guide shows how to connect alarm states, door sensors, motion events, cameras, and Home Assistant so perimeter lighting activates only when it should.
Smart Motion Sensor Automations for Dark Apartment Hallways
Build hallway lighting that turns on only when needed, stays dim at night, and avoids the annoying false-offs common with basic motion automations.

How to Automate Lights Based on Motion and Ambient Room Brightness
Build smarter lighting that turns on only when a room is occupied and actually dark. This guide combines motion or presence sensing, ambient lux thresholds, timeouts, hysteresis, and Home Assistant automation logic.
How to Set Up NFC Tags Around the House for One-Touch Lighting
Use inexpensive NFC tags as intentional one-touch lighting controls for bedside scenes, entryways, desks, and whole-home off routines without adding wall switches.